How To Render Images
What to do before rendering?
Preperation matters when rendering through SolidWorks visualize. There are 2 main steps to getting it done right.
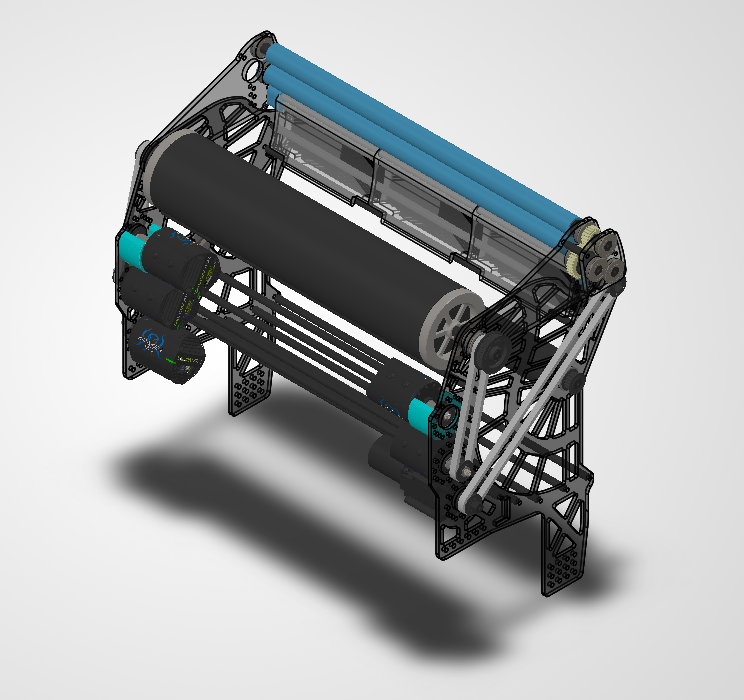
1. First things first, NO hidden parts
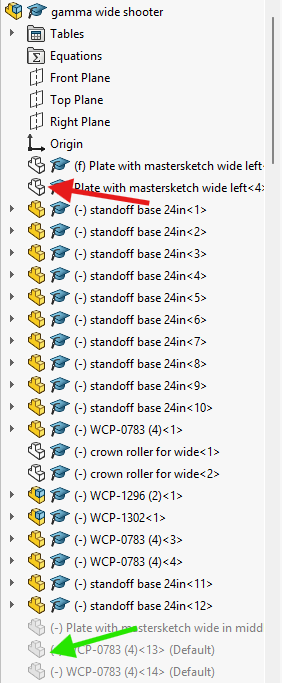
In the software, all hidden part become shown so you should either have everything shown or suppress parts that you don't want to see.
2. The second thing is making sure all parts that have different materials have different colors.
In Visualize, materials are grouped based on their color. So, if your metal parts and your plastic parts are the same color, they will be the same material. This is important because light reflects off each material different and it gives a better look when everything is the right material.
This doesn't mean they can't be similar colors; they can be so close that you can't differentiate them normally, as long as the hex code is different then you are good.
Once you do these two things you can move on to opening the program!
How to open Visualize?
Now that you have a file ready to render, we can move on to opening visualize!
1. First click the setting icon in the top bar of the menu
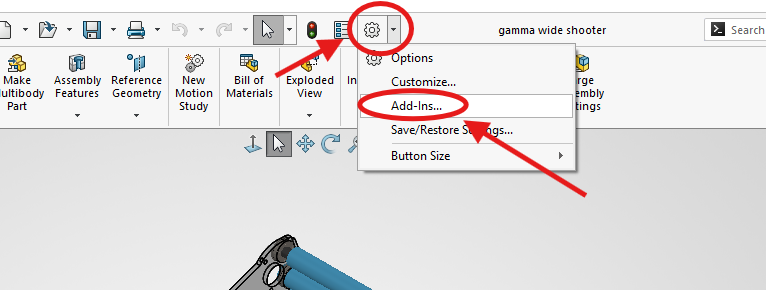
2. Then click Add-Ins
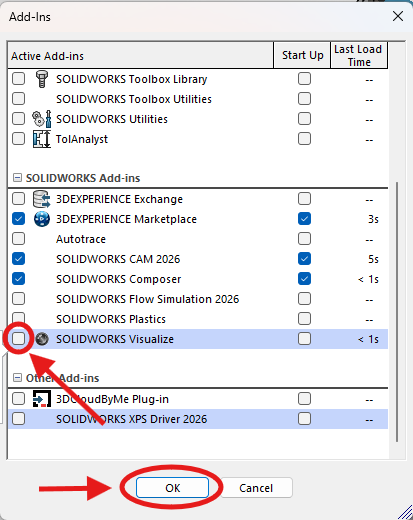
3. Next this pop-up will show up so scroll down till you see SOLIDWORKS Visualize
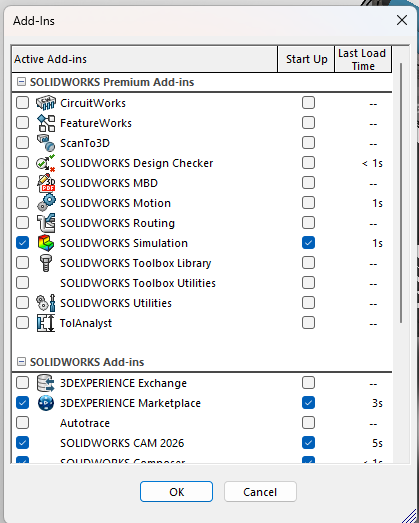
4. Then click the checkmark to the left of SOLIDWORKS Visualize and click OK.
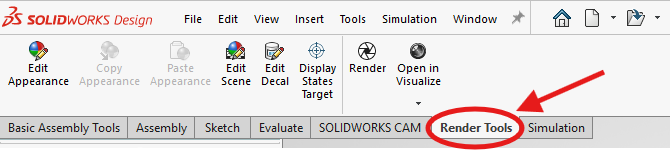
5. Then two new tabs will show up on your top bar, click Render Tools
6. Next click the arrow below Open in Visualize and Group by Appearance
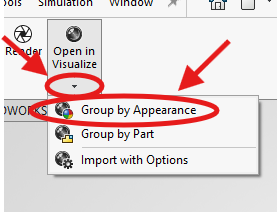
There is a glitch that when you close out SolidWorks then open it up again the Open in Visualize button is there but not clickable. If that is the case, just repeat steps 1-6 again and that will fix it.
7. Lastly you will receive the pop-up below
I would recommend creating a folder for all of your renders and changing the location to your new folder
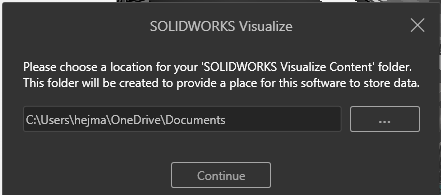
8. Once you are satisfied with the location for your renders click continue to open Visualize!
How to use Visualize
Now that you have visualize open its time to get your photos rendered.
When you first open visualize, there are many buttons and things you will be able to use. But for our need, the most important things are the four below.
The 4 include the preview in the middle of your screen, cube in the top middle, the portrait in the top right, and the paint can to the left of that.
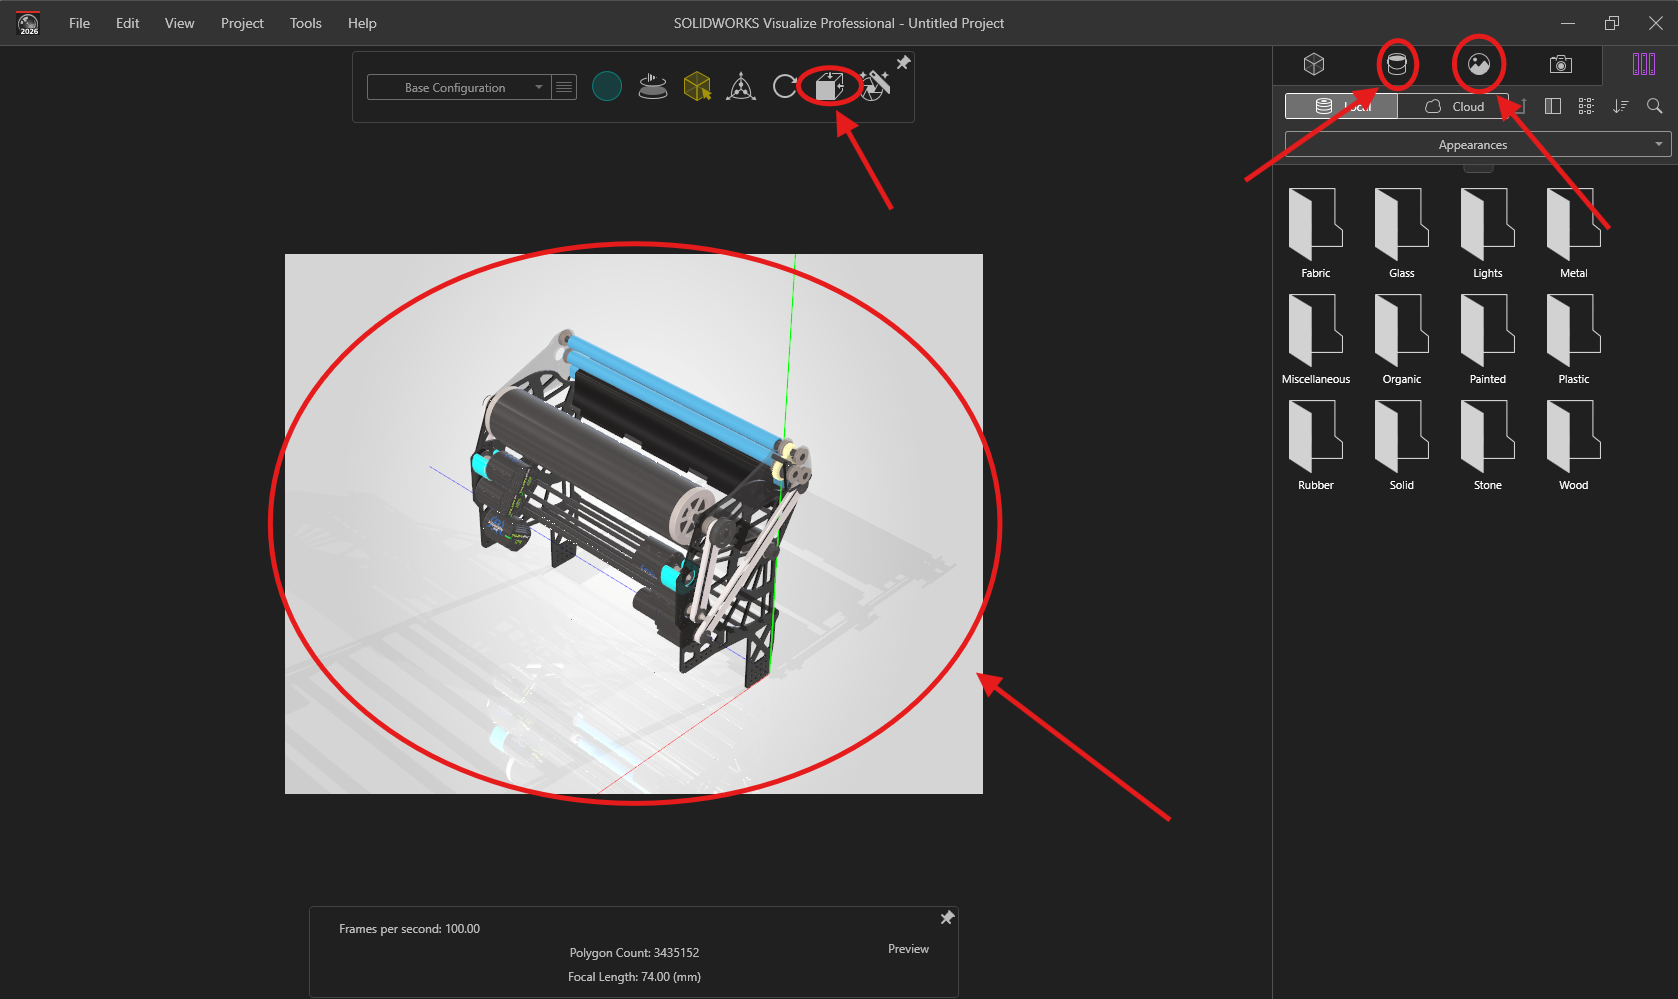
1. The preview is very simple; it acts like the 3d model of your item where you can rotate or zoom in and out.
While it does show some change when settings are changed, it is not completely accurate to the final rendering in the end.
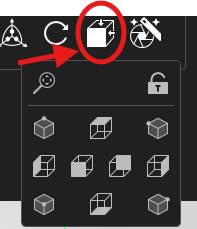
2. Next is the cube, when clicked it pulls up a small screen that allows you to change the POV easily.
Along with that it has the lock icon which stop you from being able to accidently change the POV you want.
3. Next is the paint bucket, there are many things you can do with the paint bucket, but the big one is changing the material.
Like I said in "What to do before rendering", if you made sure all your different materials are different colors then you can use the preview to click on different parts of your item and all parts with the same color will highlight and the color will pop up in Appearances.
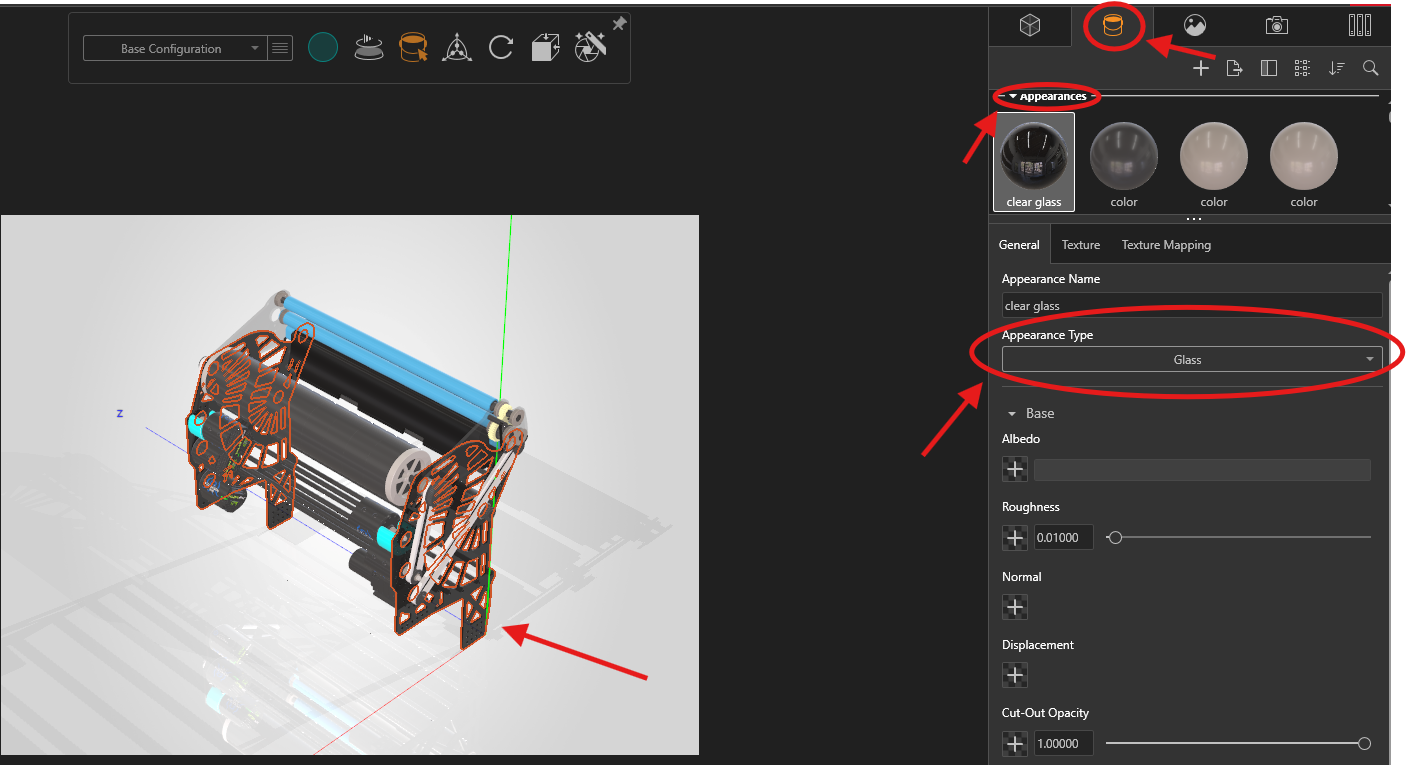
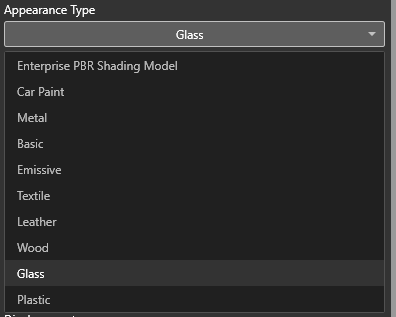
Once you have the part you want selected, click on appearance type.
This will give a dropdown menu where you can select the material you want.
While these three feature are important they are optional to use, only needed to change the POV of the photo to your liking. On the other hand, this last feature has a set of steps that are required for YETI.
The last feature on the list is the portrait and there is a set of steps you must do to get a good render.
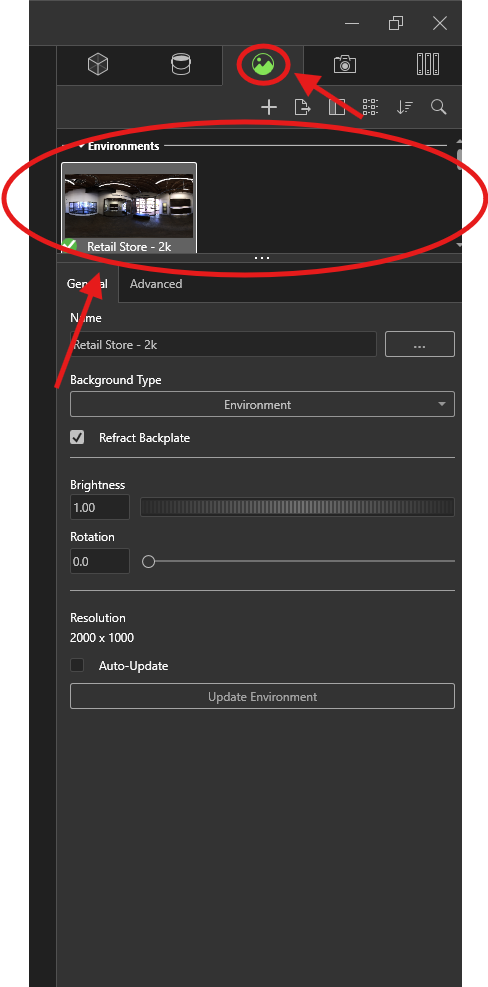
1. First, you need to find the box that says environments and scroll down till you see Backplates.
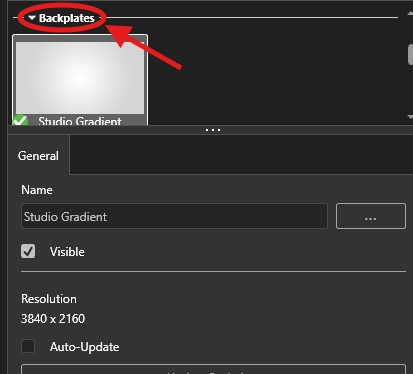
2. Next you will click on Studio Gradient and then the 3 dots next to Name.
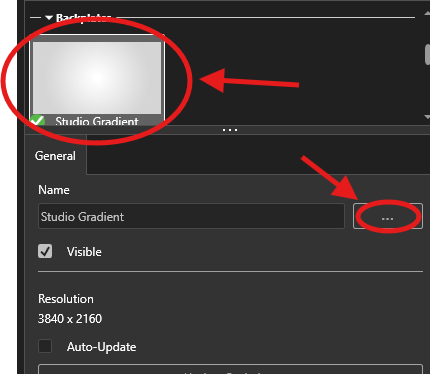
3. Then you need to pick a downloaded photo of a pure white screen from your files.
This can be anything from a screenshot to a download.

There is a white photo above this disclaimer on top of the black line that you can save and download.
4. Once you got a photo selected click open and move on

If your preview turns black just click where it is supposed to be and that will turn it back.
5. Next scroll back up from backplates to environments and click on which ever environment you want.
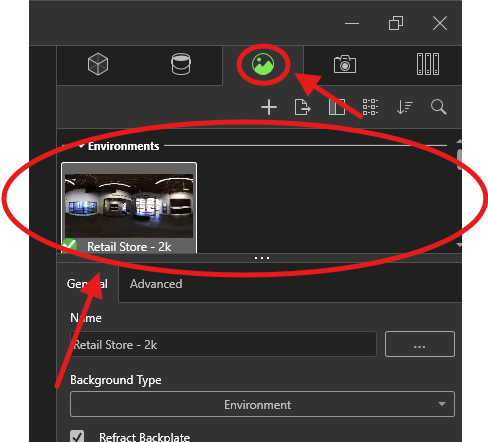
6. That will bring up an advanced option here for you to click on.
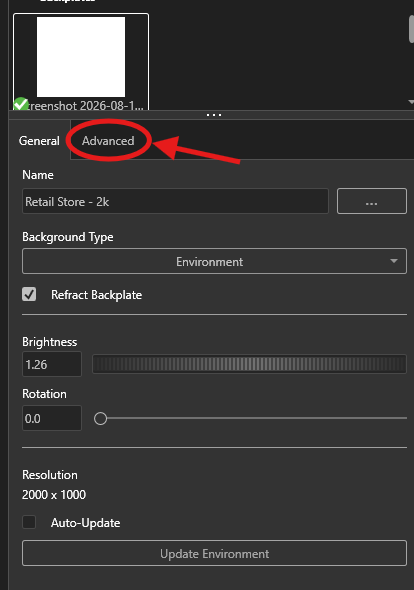
7. That will bring up many different setting but the two most important are Brightness and Shadow Intensity.
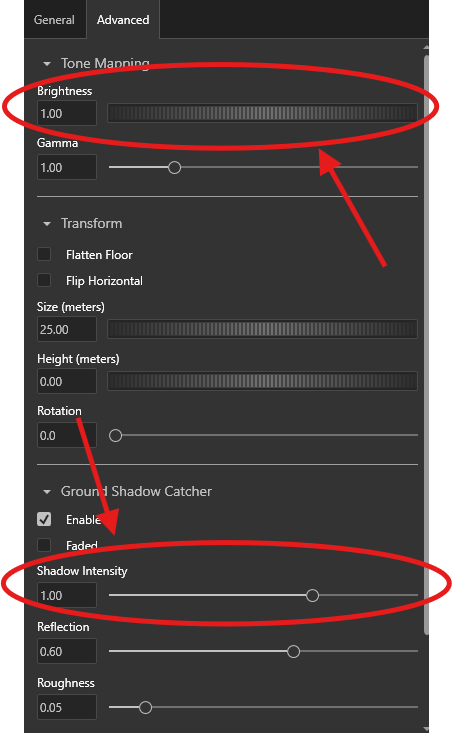
8. First, we will deal with Shadow Intensity, set it to 0 but make sure Ground Shadow Catcher and Faded are enabled.
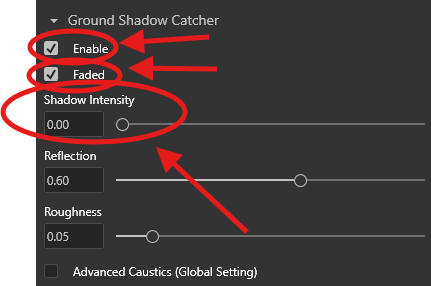
This is because shadows on the ground look bad in photos, but when they are completely disabled the photos look bland. As a solution, setting the shadow intensity to zero and setting it to faded allows no shadows on the ground but still a natural look on the item.
9. As for the Brightness it is up to you, you can make it brighter or darker and render different photos to see what looks best.
Remember that the look you see in the preview is not what it will actually look like so if you want to see how changing the brightness actually changes the photo you will need to render it every time.
Now that all the Visualize settings are all out of the way it's time to move on to actually rendering the image!
How to render a photo?
Now that you have gone through all the steps needed to render a good photo it's time to get the final product!
1. On your normal visualize screen you will see a button called Tools in the top left of the screen.
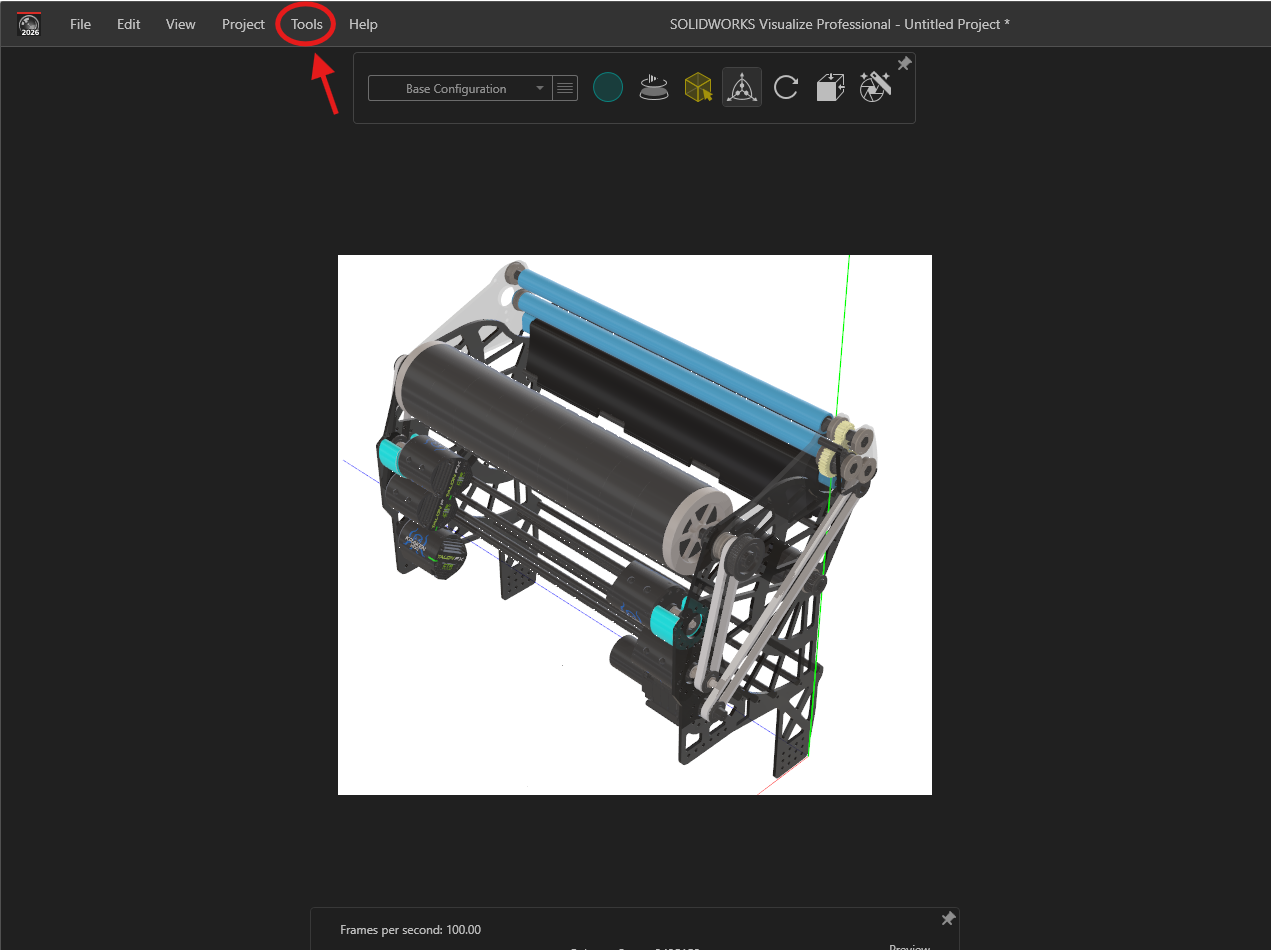
2. When you push the tools button a couple of options will show up including a button called Render which you will click.
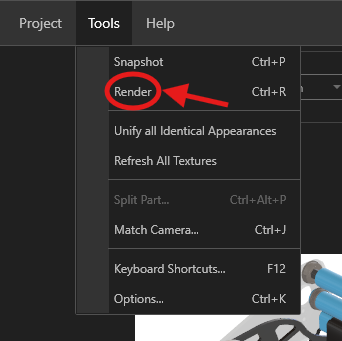
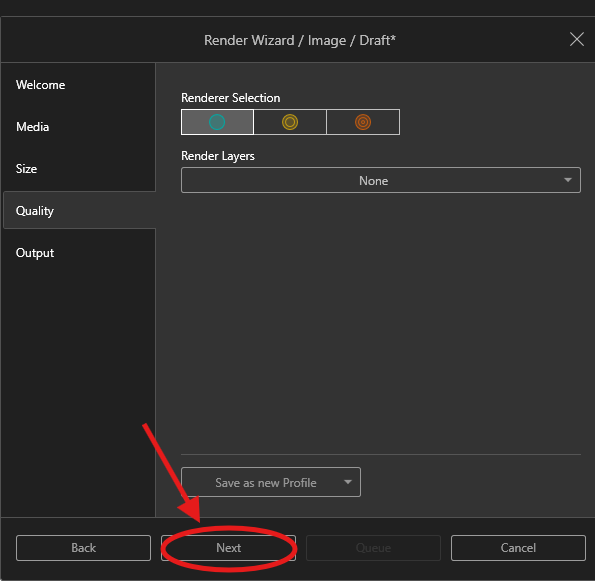
3. That will cause a pop-up to show up, click next.
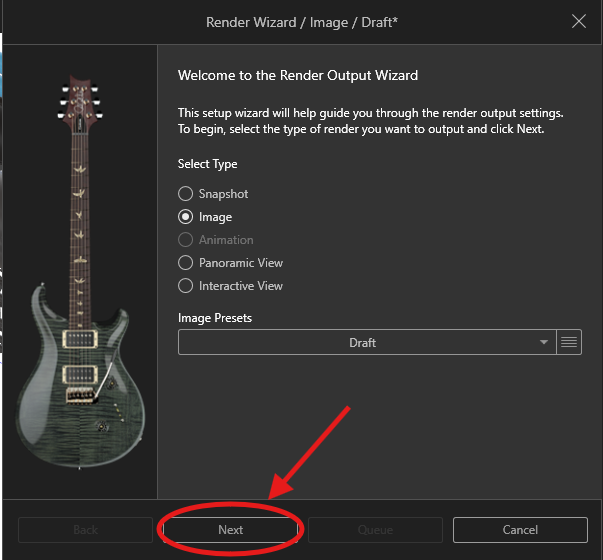
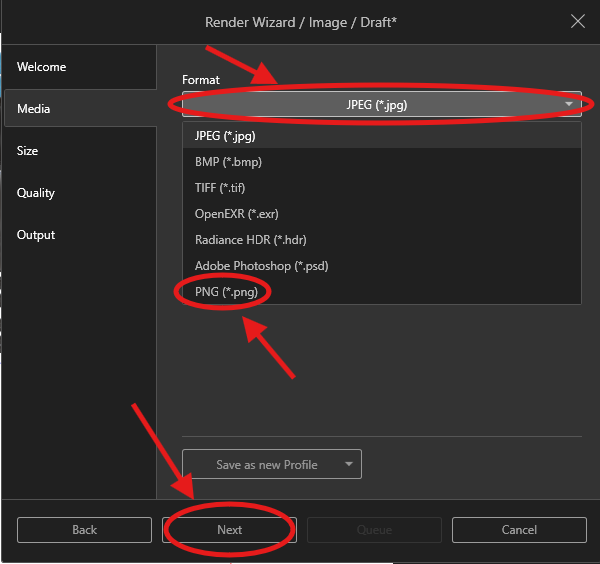
4. Next click on Format, then select the PNG option, finally click Next.
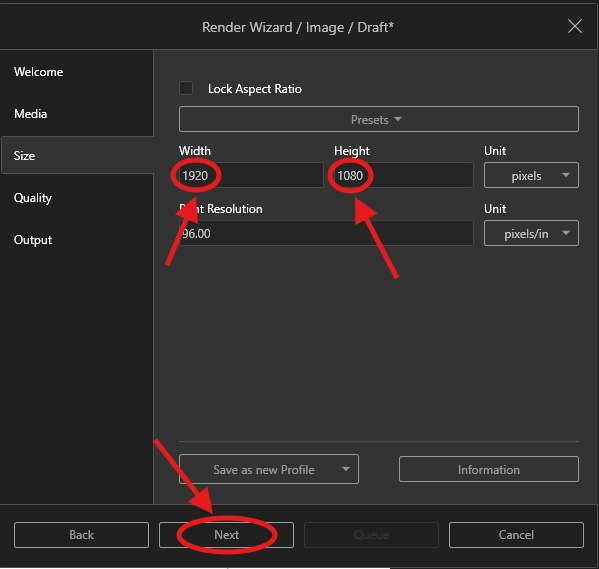
5. On the next page change the Width to 1920 and the Height to 1080 as you see in the photo below.
Then click Next.
6. Then click Next on this page.
7. Lastly name your file and make sure you have the correct output folder.
Then click render!
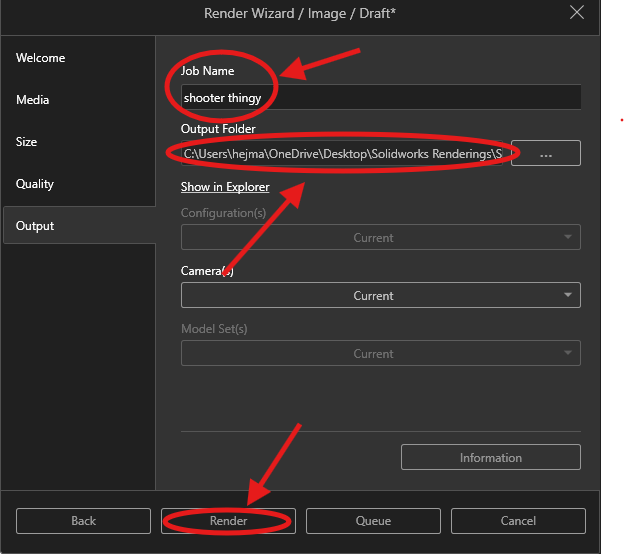
The changes you make in Steps 4, 5, and 7 will save for the project but as soon as the program is closed you will have to reinput those values again.
This will start rendering the photo and show a preview of what you have taken in the output viewer.
The output viewer shows the photos that you have rendered in this project and each render that you take shows up as a separate tab and the left side of the screen.
To take multiple renders you can switch back to the original page by clicking on the tab next to output viewer.
To delete unwanted or extra renders click on the X button on the tab you want to remove.
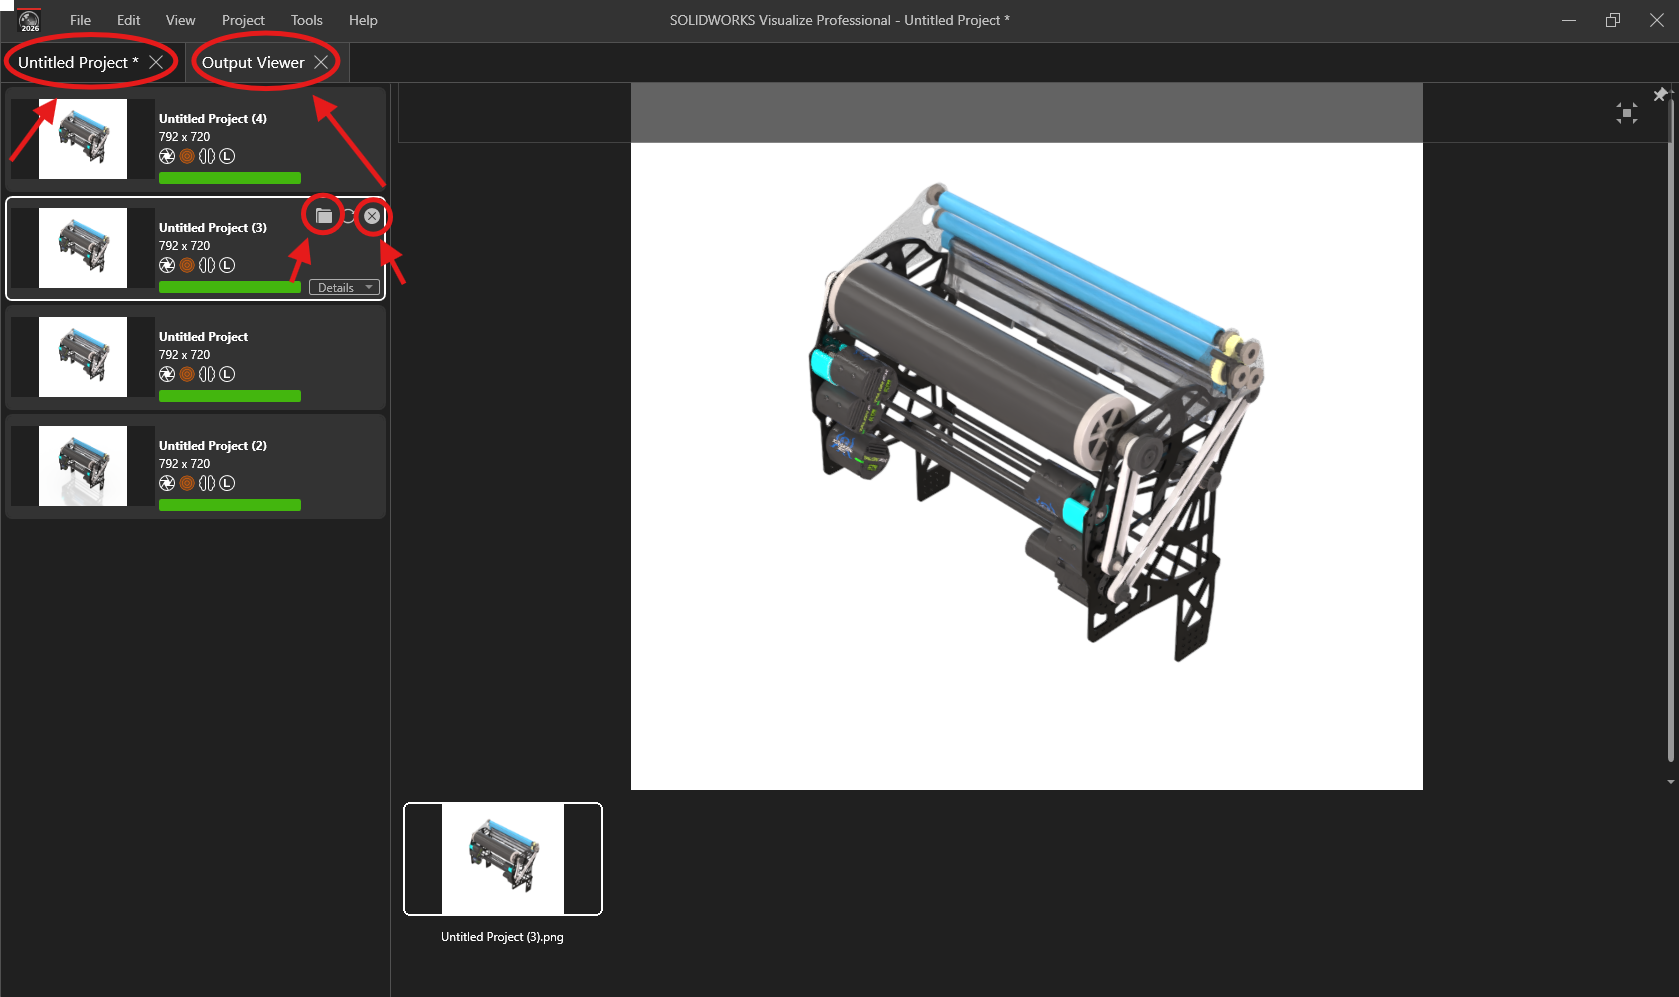
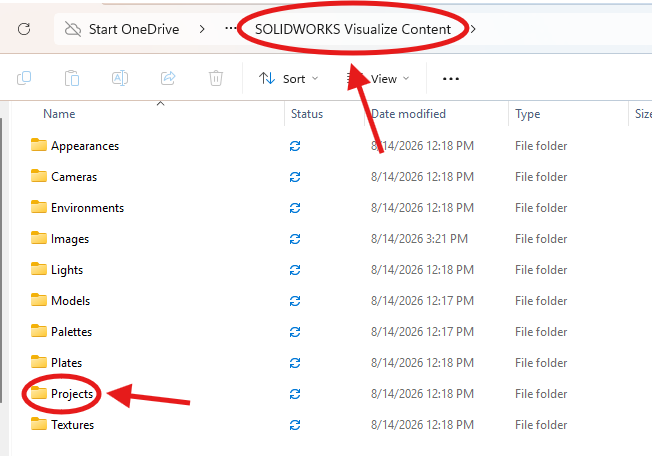
To find the folder that your photos are in you can either click the folder icon on the tab you are on or go to the output folder you have selected to save your photos in, in that folder you will see the SOLIDWORKS Visualize Content folder, open that folder then inside that open the images folder.
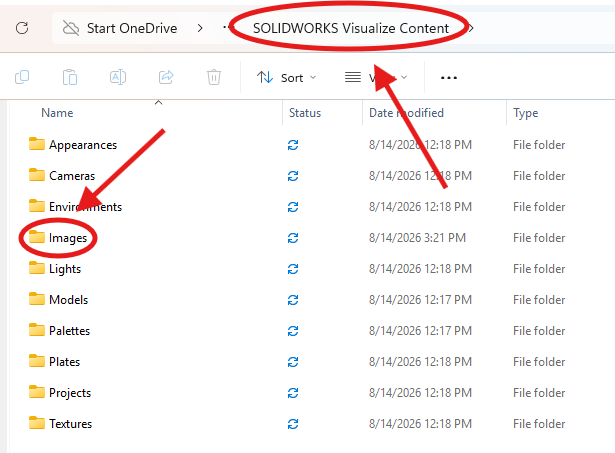
In the images folder you will see all the photos you have rendered.
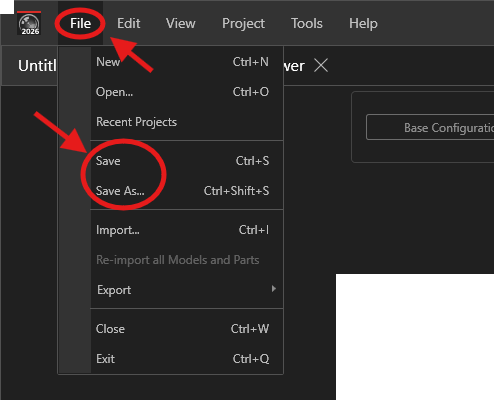
You can save the Visualize project by clicking File and Save that way you can save the changes you made and make more renders later.
Those projects will be saved in the SOLIDWORKS Visualize Content folder under the projects folder
Congratulations, this is everything you need to know for YETI rendering!