Shooter Designs
Projectiles in FRC: A Practical How-To Guide
1) Pick a launcher style (pros/cons & when to use)
-
Hooded flywheel (single/dual wheel): Most common, accurate over a range; add an adjustable hood for multiple shot locations.
-
Good for balls/notes.
-
To achieve backspin on the game piece, use one flywheel.
-
For flat spin and front spin, use two flywheels. Chief Delphi+1
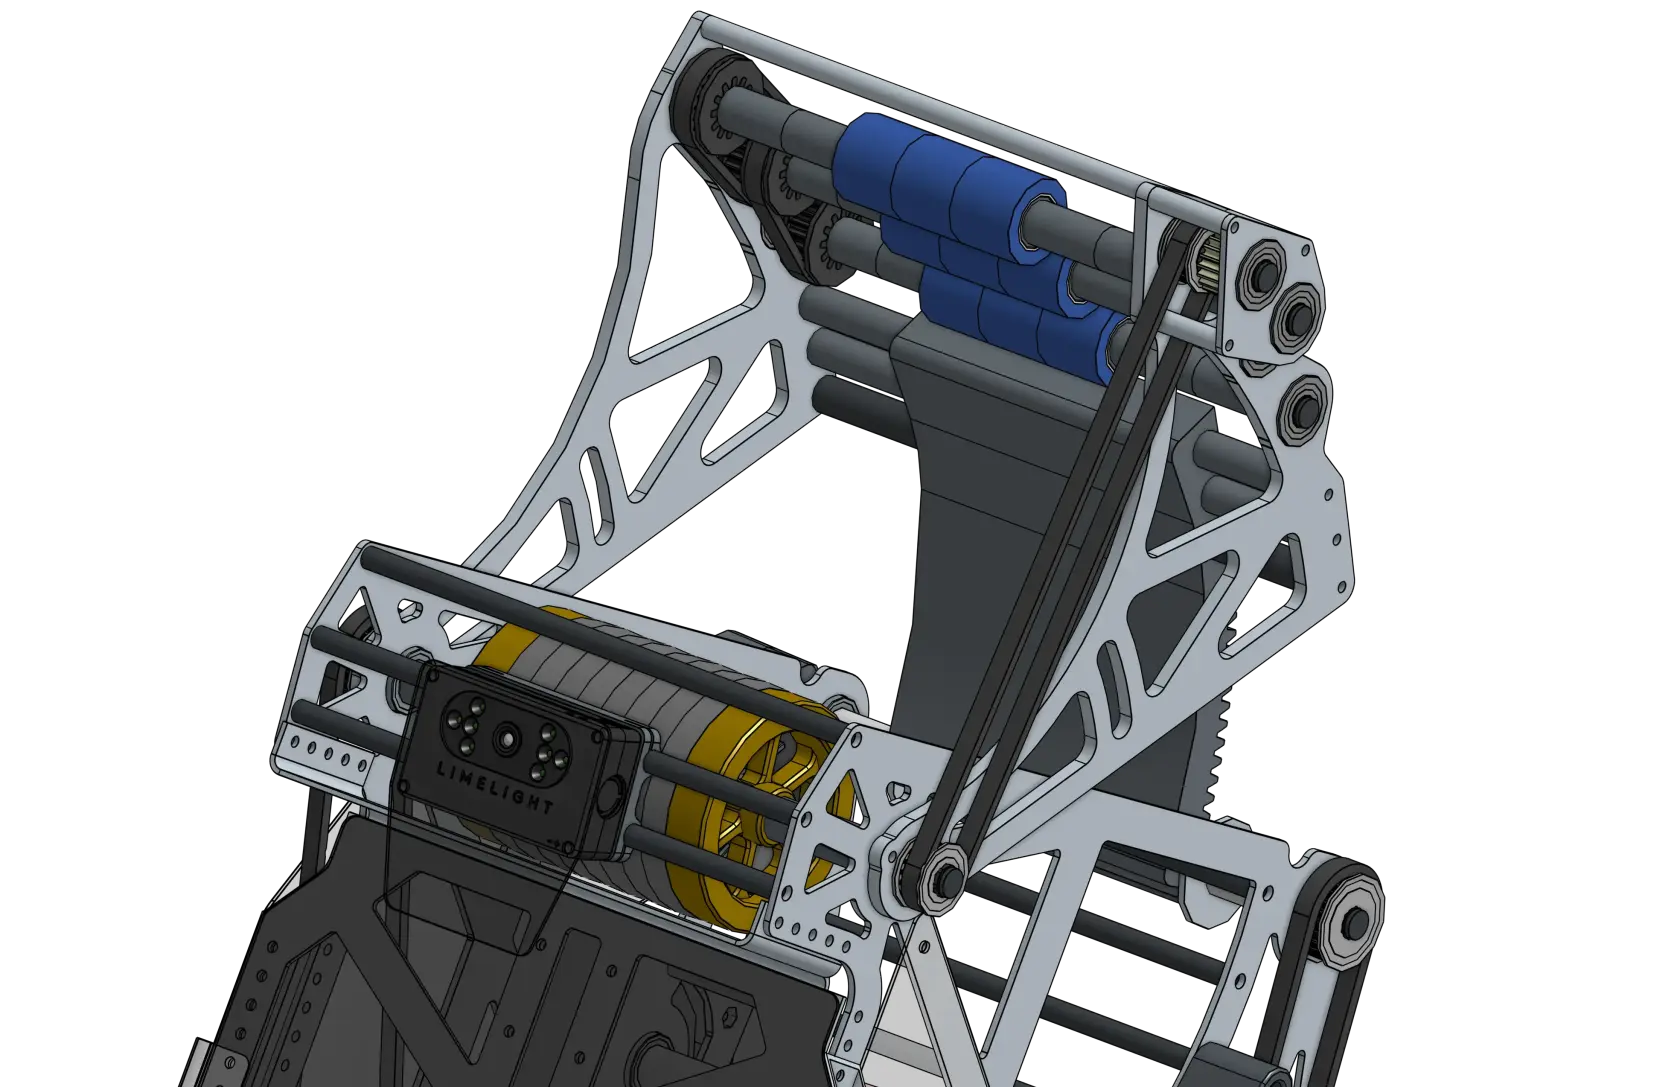
Hooded shooter built by 1678
-
Catapult/puncher (spring/elastic/motor-latched): Great for heavier/softer objects or when you want consistent “set-shot” distances; needs careful energy storage & release sizing.
-
A common mechanism for tension-based launchers is the choo-choo.
-
This works similarly to a train wheel, where a wheel rotates and at a certain point, it will engage a linkage, priming it.
-
It will then rotate and let go of the linkage, releasing energy. Chief Delphi+1


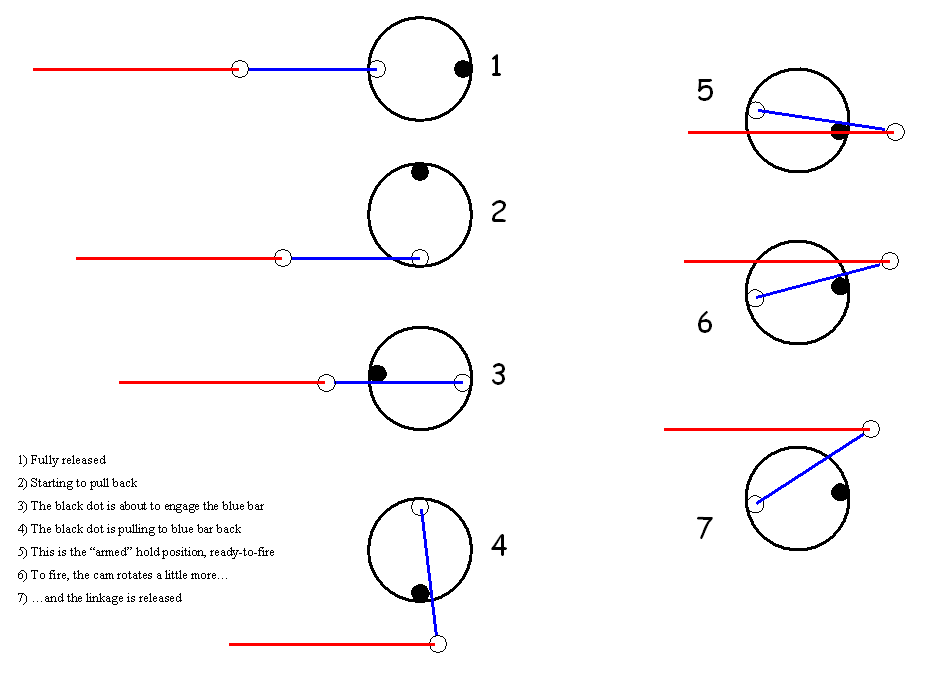
Puncher built by 1114 Choo-Choo mechanism diagram
-
Turret vs. fixed: Turret simplifies driver alignment and allows shooting while driving; a fixed shooter is lighter and simpler.
-
A fixed shooter will use its drivetrain (usually swerve) to aim.
-
Fixed shooters will commonly use a two-plate design.
-
Turret shooters also may have to be zeroed before each match. (See 254’s turreted designs & feeder integration.) Chief Delphi+2media.team254.com+2
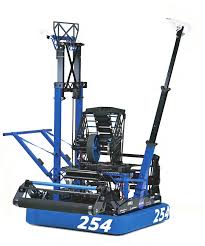
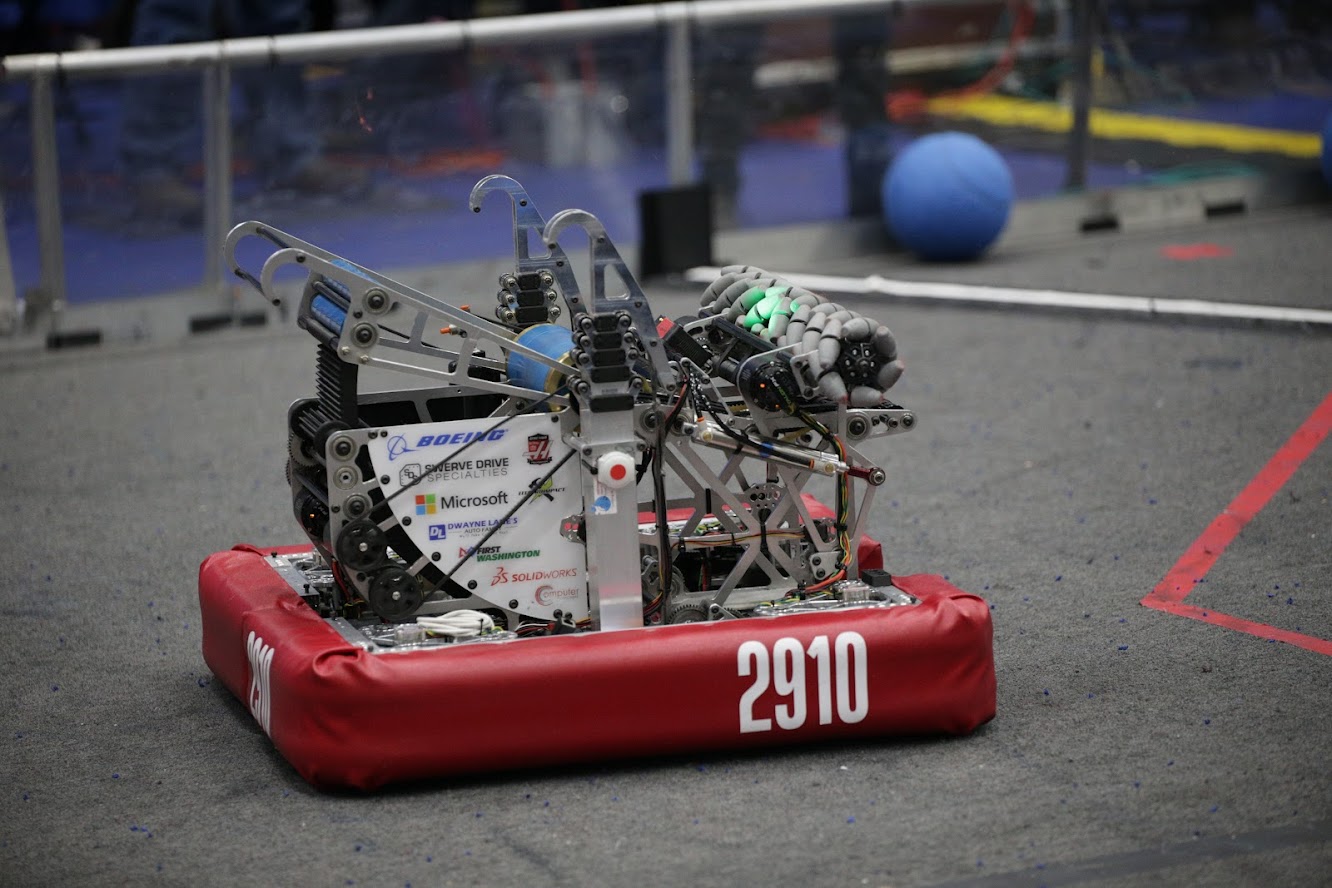
Turret shooter built by 254 Fixed shooter built by 2910
2) Shooter geometry & compression (for hooded flywheels)
Goal: Control contact time and spin so the game piece leaves at a repeatable speed/angle.
How to:
-
Start with compression: Distance from wheel to hood smaller than the game-piece diameter. Typical starting point many teams reported in 2020: ~1.5–2.5 in; tune per game piece. Chief Delphi+1
-
Choose hood material: Polycarbonate is common; grippier liners increase spin if the piece slips on the hood. Chief Delphi
-
Wheel diameter & inertia: Bigger wheels give higher surface speed at the same RPM and generally more energy storage (flywheel effect); trade against weight & packaging. Chief Delphi
-
Adjustable hood: Enables one mechanism to hit multiple distances/angles; CAD your arc so the normal force and compression stay reasonable across angles. Chief Delphi
-
Rear “kicker”/pre-spin roller (optional): Can improve feeding and reduce shot-to-shot variation; prototype to validate. Chief Delphi
3) Motors, gearing, and energy
How to:
-
Pick motor(s) to match your RPM/torque needs (NEOs/Falcons/775pros). Prototype one motor, log RPM recovery, then scale; example community configs exist (e.g., multi-775pro setups). Chief Delphi
-
Gearing: Target a no-load free-speed that’s 10–30% above your on-shot speed to allow headroom for control.
-
Flywheel inertia: Add mass (steel plates or heavy hub) for better velocity hold-up during a shot—balance vs. spin-up time. (See CD compression threads discussing plate “disks”.) Chief Delphi
4) Feeding, centering, and serialization
Why it matters: Consistent entry orientation & speed reduces shot variance.
How to:
-
Center & single-file: Use “serializer” rollers/geometry to turn wide intakes into a single, well-registered stream. (Great example write-ups in 254 tech binders.) media.team254.com+1
-
Metering sensors: Beam breaks/hall sensors before the shooter to time the feed when RPM is on-target.
These sensors are used to track the ball’s location in order to figure out where it is in the robot. They are placed before the shooter to time the feeding of the game pieces into it when the motors operate as predicted. Specifically, when the Rotations Per Minute (RPM) are on-target.
-
Isolation: Use compliant wheels and passive rollers to control the ball and avoid jams before the throat. media.team254.com
- Electrical Isolation: It makes sure that one electrical part doesn't affect another electrical part in the robot.
-
Program Isolation: It makes sure that the sensor only senses the ball. It also keeps the sensor clean so it can read the ball.
-
Mechanical Isolation: It makes sure that the no important parts get damaged from bumps. It keeps parts separate so they don’t damage each other, like making sure the shooter’s screws or edges don’t cut or hurt the ball while shooting or moving and vice versa, by adding like covers, the ball touching a smooth surface, or using soft material.
5) Control: getting repeatable velocity (and fast recovery)
Core strategies you can implement in WPILib:
-
Bang-bang: Simple on/off for hitting setpoint quickly—great baseline. FIRST Robotics Competition Documentation
-
PID/FF velocity control: Use WPILib’s tuning flow; characterize kS/kV/kA, then add PID for disturbance rejection. FIRST Robotics Competition Documentation
-
State-space (advanced): Model-based control for excellent disturbance handling and recovery. WPILib has an end-to-end flywheel walkthrough. FIRST Robotics Competition Documentation
Practical steps:
-
Characterize the shooter (SysId or logged step tests) and compute feedforward. FIRST Robotics Competition Documentation
-
Tune: hit open-loop near the target, then close the loop; verify recovery time between rapid shots. FIRST Robotics Competition Documentation
-
Disable motor-safety for flywheels (keeps them spinning during control loops). FIRST Robotics Competition Documentation
6) Trajectory, spin, and aim
How to:
-
Backspin/topspin: More backspin often stabilizes flight and can help “drop-in” style goals; tune with hood friction and wheel-hood speed ratio. Chief Delphi
-
Distance tables: Build RPM/hood-angle lookup tables per range—collect data at marked distances, interpolate in code.
-
Turret/hood strategy: Decide “fixed hood + turret + velocity” vs. “adjustable hood + fixed shooter” based on game tasks and protected zones. (Notes from Spectrum & 2024 meta.) Chief Delphi
7) Catapults & punchers (elastic or motor-latched)
How to:
-
Pick energy storage: Surgical tubing, gas springs, torsion springs; estimate spring rate and energy (½ k x²). Old but useful CD references give ballpark tubing rates—always validate on a test rig. Chief Delphi
-
Size the actuator/gearbox: Use a simple simulation or spreadsheet to match wind-up torque, angular speed, and release angle (see “Electric Catapult Design & Optimization”). Chief Delphi
-
Latch & release: Robust hard latches or dog clutches; ensure pre-load can’t self-release and add physical hard-stops.
-
Cycle time: Design for safe reset under defense (ratchets or worm-gear holds).
8) Prototyping plan (fast & reliable)
How to:
-
Bench rigs first: 2×4 frame, adjustable hood arc, sliding wheel-to-hood distance. Swap wheels/materials quickly.
-
Log everything: RPM before/after shot, time-to-recover, ball exit speed (phone high-fps), hit rate vs. distance.
-
Parameter sweeps: Try compression steps (e.g., +0.25 in), wheel durometer, hood liners, release angles—record a matrix.
-
Durability checks: Shoot 100+ cycles and re-measure your “dialed” values to see drift (wheel wear, liner glazing).
Resources with examples & prototyping ideas: Spectrum resources hub and build blogs. spectrum3847.org+1
9) Software integration: from sensor to shot
How to:
-
Sensor suite: Encoder on flywheel; beam break at exit; gyro/odometry for range estimate; (optionally) vision for pose/aim assist.
-
Shot gating: Only feed when
abs(vel - setpoint) < tolerancefor N ms. -
Auto-aim options: Turret PID to vision target or odometry-based “dead-reckon” with distance→RPM/angle tables. (WPILib control tutorials cover tradeoffs.) FIRST Robotics Competition Documentation
10) Mechanical details that matter
-
Stiff mounting: Shooter & hood need rigidity (avoid deflection changing aim). Elite teams detail robust interfaces between turret and shooter. Chief Delphi
-
Ball path sealing: Close gaps so you don’t lose pressure/energy.
-
Serviceability: Quick-change wheels/liners; access panels for cleaning debris.
-
Safety: Shields around flywheels; never stand in plane of the wheel; interlocks for test mode.
11) Strategy fit & on-field use
How to:
-
Decide shot families you’ll own (e.g., protected zone, “subwoofer,” mid-field). 2024 takeaways: multi-location shooting boosts cycle flexibility but increases complexity—picking one or two money shots can still be very effective. Chief Delphi
-
Warm-up & calibration: Spin up on enable; auto-zero hood; shoot a short drill to confirm RPM table after field reset.
-
Maintenance: Re-index compression (liners wear), check set screws, re-true wheels weekly.
12) Build-season checklist
-
Define target ranges/angles and cycle goals (with strategy).
-
Select launcher type; CAD the geometry (arc, compression, packaging).
-
Prototype quickly; collect a data table and pick initial control strategy.
-
Integrate a reliable feed path with sensors.
-
Lock in materials, fasteners, guards.
-
Code gating & recovery; validate with drill cards (e.g., 10 rapid shots at 2 ranges).
-
Create pit procedures for inspection, alignment, and upkeep.
Suggested “Further Reading” blocks for your wiki
-
WPILib: Tuning a flywheel, state-space flywheel control, strategy choice. FIRST Robotics Competition Documentation+2FIRST Robotics Competition Documentation+2
-
Spectrum 3847 resources and build blogs (design slide decks, prototyping ideas). spectrum3847.org+1
-
ChiefDelphi canonical threads on hood geometry, compression & materials. Chief Delphi+3Chief Delphi+3Chief Delphi+3
-
Catapult math & examples. Chief Delphi+2Chief Delphi+2
-
Elite team tech binders for feeder/serializer & turret integration. media.team254.com+2media.team254.com+2