Polar Edge Analytics
Documentation for our scouting website.
Getting Started
Resources for getting started developing Polar Edge Analytics locally.
What Do I Need to Know?
Our goal is that L1 web devs should be able to take on UI work within the scouting site, while L2 can take on entire features. The following quick-start covers resources for reaching L1:
https://wiki.yetirobotics.org/books/web-development/page/web-development-quickstart
Discord OAuth
Repository Installation and Setup
This guide discusses setting up the Polar Edge Analytics repository for local development.
Prerequisites
This guide assumes you have the following already set up (TODO: add references on how to get these configured)
- Node.js installed; we recommend using nvm (MacOS/Linux) or fnm (Windows) to manage your Node.js version
- pnpm installed
- Docker installed
Get Scouting
You will first need to clone the polar-edge repository.
Once cloned, in the repository root directory, run pnpm install to install dependencies across the entire repository. We recommend installing the turbo CLI globally to make running commands easier. This can be done by running pnpm i -g turbo.
Developing applications often requires the use of environmental variables. These are used to configure various secrets and environment-specific configuration (i.e., is this running on someone's laptop or is it the hosted version of the scouting site). In order to prevent API keys from being leaked on the internet, these are stored in a file that is only on your machine and not tracked by Git.
A file titled .env.example exists in the apps/scouting folder. This is a template you can use in creating your .env.local. To create your .env.local, do the following:
- Create a copy of the
.env.examplefile and rename the copy to.env.local - Create a new application in the Discord Developer Portal. After creating the app, go to the tab titled "OAuth2." Copy the client id value, and set DISCORD_CLIENT_ID to this value in your
.env.local. Click the "Reset Secret" button in the Discord Developer portal to get the client secret, and do the same. You should NEVER share the secret value. - Still in the OAuth2 tab, add the following URL to the Redirects section:
http://localhost:3000/api/auth/callback/discord - Add your Discord username to the
.env.localfor ADMIN_USERS. This value is shown in the bottom left corner of Discord
This should be all the setup required for everyday development of the scouting application. To get the development server running, first ensure you have Docker running. Running pnpm dev:scouting or turbo dev --filter scouting will launch the database, and start up the scouting app.
Recommended VSCode Extensions and Configuration
Our application used Tailwind and Biome, both of which have very helpful extensions for VSCode:
- https://marketplace.visualstudio.com/items?itemName=bradlc.vscode-tailwindcss
- https://biomejs.dev/reference/vscode/
To configure VSCode settings for the workspace, create a folder called .vscode in the root of the repo. Within that, create a file called settings.json (this should not be tracked by Git, as settings are user-specific). Paste the following content:
{
  "editor.defaultFormatter": "biomejs.biome",
  "editor.formatOnSave": true,
  "editor.codeActionsOnSave": {
    "source.fixAll.biome": "explicit",
    "source.action.useSortedKeys.biome": "explicit",
    "source.organizeImports.biome": "explicit"
  },
  "[typescript]": {
    "editor.defaultFormatter": "biomejs.biome"
  },
  "[typescriptreact]": {
    "editor.defaultFormatter": "biomejs.biome"
  },
  "[json]": {
    "editor.defaultFormatter": "biomejs.biome"
  },
  "[jsonc]": {
    "editor.defaultFormatter": "biomejs.biome"
  },
  "[css]": {
    "editor.defaultFormatter": "biomejs.biome"
  },
  "[javascript]": {
    "editor.defaultFormatter": "biomejs.biome"
  },
  "[javascriptreact]": {
    "editor.defaultFormatter": "biomejs.biome"
  },
  "tailwindCSS.experimental.configFile": {
    "packages/ui/src/styles/globals.css": [
      "packages/ui/src/**",
      "apps/scouting/src/**",
      "apps/basecamp-fe/src/**"
    ]
  }
}
This will enable formatting on save, and set the default formatter to Biome. This also points the TailwindCSS Intellisense extension to the correct configuration file.
Get Basecamp(ing)
WIP, docs coming soon as this is a bit more complicated...
Repository Architecture
This document describes the structural conventions used across the Polar Edge monorepo. Follow these patterns when adding features, refactoring, or creating new apps.
Monorepo Layout
The repository is a Turborepo monorepo managed with pnpm workspaces.
polar-edge/
├── apps/
│   ├── scouting/        # Main scouting app (Next.js 16 + Turbopack)
│   ├── basecamp/        # Backend service (NestJS, Discord bot, Sheets)
│   └── basecamp-fe/     # Frontend for Basecamp features (Next.js)
├── packages/
│   ├── ui/              # Shared Radix UI component library
│   ├── tba-sdk/         # The Blue Alliance API TypeScript client
│   ├── ai/              # Shared AI/LLM utilities
│   ├── twofa/           # Two-factor authentication utilities
│   ├── typescript-config/
│   └── vitest-config/
└── turbo.json
Key rules:
- Business logic lives in
apps/— packages are pure utilities with no app-specific logic. - Shared packages are consumed as workspace dependencies (
@repo/ui,@repo/tba-sdk, etc.). - Run tasks through Turbo:
turbo build,turbo dev --filter=scouting, etc. Don't run app scripts directly unless you have a reason.
Feature-First Architecture
Both Next.js apps (scouting and basecamp-fe) use a feature-first layout. The src/app/ directory is intentionally thin — it contains only Next.js routing files. All business logic, data access, and feature-specific components live in src/features/.
src/
├── app/              ← Routing only. Pages delegate to features.
├── features/         ← Primary home for all business logic.
│   └── <feature>/
│       ├── actions.ts       # Server actions
│       ├── queries.ts       # Database reads
│       ├── types.ts         # Feature-specific types
│       ├── components/      # Feature-specific React components
│       ├── hooks/           # Feature-specific client hooks
│       └── contexts/        # Feature-specific React contexts
├── components/       ← Shared UI used across multiple features (nav, layout, etc.)
└── lib/              ← Pure utilities and library config. No feature logic.
The benefit: when you need to find or change anything about the "picklist" feature, you go to src/features/picklist/. You don't have to hunt across src/app/, src/utils/, src/api/, etc.
App Router Conventions
Pages are thin
Pages (page.tsx) should authenticate, load data, and compose feature components. They should not contain business logic themselves.
// ✅ Good — app/admin/members/page.tsx
export default function MembersPage() {
  return (
    <main className="container mx-auto max-w-5xl px-4 py-8">
      <TypographyH1>Team Members</TypographyH1>
      <Suspense fallback={<LoadingTable />}>
        <MembersContent />   {/* async RSC from features/ */}
      </Suspense>
    </main>
  );
}
The data-fetching and rendering logic lives in MembersContent, which is an async RSC imported from src/features/org/members/.
Async Server Components for data
Prefer async RSCs for data fetching. Place the async component in features/ and import it into the page:
// features/org/members/components/MembersContent.tsx
async function MembersContent() {
  const activeMember = await requireAdminMember();
  const members = await fetchMembers(activeMember.organizationId);
  return <MembersTable members={members} />;
}
Suspense boundaries
Wrap async data-fetching components in <Suspense> in the page. Provide a meaningful skeleton as the fallback — not just a spinner. This enables streaming and prevents the whole page from blocking.
<Suspense fallback={<LoadingTable />}>
  <MembersContent />
</Suspense>
Feature Module Anatomy
Each feature in src/features/<feature>/ follows this file structure. Not every file is required — only create what the feature needs:
| File / Directory | Purpose |
|---|---|
actions.ts |
Next.js Server Actions ("use server"). Mutations only — auth, validate, write DB. |
queries.ts |
Database reads. Always import "server-only". Use "use cache" for expensive reads. |
types.ts |
TypeScript types and interfaces specific to this feature. |
components/ |
React components used only by this feature. |
hooks/ |
Client-side React hooks used only by this feature. |
contexts/ |
React context providers used only by this feature. |
*.test.ts |
Tests co-located with the code they test. |
Example — picklist feature:
src/features/picklist/
├── actions.ts        # createPicklist, deletePicklist, reorderTeams, etc.
├── queries.ts        # getPicklistsForOrganization, etc.
├── types.ts          # PicklistTeam, PicklistWithTeams, etc.
└── components/
    ├── CreatePicklistDialog.tsx
    ├── PicklistTeamsTable.tsx
    ├── DeletePicklistButton.tsx
    └── ...
Example — nested features (org):
When a domain has sub-features with distinct concerns, nest them:
src/features/org/
├── settings/
│   ├── actions.ts
│   └── components/OrganizationSettingsForm.tsx
├── members/
│   ├── actions.ts
│   └── components/
│       ├── RemoveMemberButton.tsx
│       └── RoleSelect.tsx
└── invites/
    ├── actions.ts
    └── components/InviteLinkManager.tsx
Server Actions Pattern
Server actions live in features/<feature>/actions.ts and always follow this order:
"use server";

export async function exampleAction(input: unknown) {
  // 1. Authenticate — get session
  const session = await auth.api.getSession({ headers: await headers() });
  if (!session) return { error: "Unauthorized" };

  // 2. Authorize — get active org member (role check if needed)
  const member = await auth.api.getActiveMember({ headers: await headers() });
  if (!member) return { error: "No active organization" };

  // 3. Context — get active event if relevant
  const event = await getActiveEventForOrganization(member.organizationId);
  if (!event) return { error: "No active event" };

  // 4. Validate input
  const validated = schema.safeParse(input);
  if (!validated.success) return { error: "Invalid input" };

  // 5. Write — use a transaction for multi-table operations
  const result = await db.transaction(async (tx) => {
    // ... perform operations
    return data;
  });

  // 6. Return success or error (never throw to the client)
  return { success: true, data: result };
}
Rules:
- Always return
{ error: string }or{ success: true, ... }— never throw. - Use
db.transaction()when writing to multiple tables atomically. - Validate every external input with Zod before touching the database.
- Do not perform mutations from
queries.ts— keep reads and writes separate.
Data Queries & Caching
Database reads live in features/<feature>/queries.ts. Always mark this file as server-only:
import "server-only";
This prevents accidental import in client components and gives a clear build-time error if it happens.
Use "use cache" for expensive reads
For reads that are called frequently or are expensive, use Next.js's "use cache" directive with cacheLife and cacheTag:
import "server-only";
import { cacheLife, cacheTag } from "next/cache";
import { cacheTags } from "@/lib/cache";

export async function getStandFormCounts(
  organizationId: string,
  eventId: string | null
) {
  "use cache";
  cacheLife("hours");
  cacheTag(cacheTags.leaderboardStand(organizationId));

  return db
    .select({ ... })
    .from(standForm)
    .where(...);
}
Cache tag centralization
All cache tag strings are defined in src/lib/cache.ts. Never hardcode tag strings at the call site — always use the cacheTags object:
// src/lib/cache.ts
export const cacheTags = {
  leaderboardStand: (organizationId: string) => `leaderboard-stand-${organizationId}`,
  teamMetrics: (eventId: string) => `team-metrics-${eventId}`,
  // ...
};
When a mutation invalidates cached data, call revalidateTag(cacheTags.leaderboardStand(orgId)) in the relevant server action.
Parallel data fetching
When a page or component needs multiple independent pieces of data, fetch them in parallel with Promise.all:
const [organization, members] = await Promise.all([
  auth.api.getFullOrganization({ ... }),
  auth.api.listMembers({ ... }),
]);
RSC Boundaries — Server vs Client
Next.js components are Server Components by default. Only add "use client" when a component needs browser APIs, state, or event handlers.
Server Components (default)
- Fetch data directly (async/await)
- Access cookies, headers, environment variables
- Import server-only code (DB, auth, etc.)
- Cannot use
useState,useEffect, or browser APIs
Client Components ("use client")
- Interactive UI — event handlers, state, effects
- Browser APIs (
window,localStorage, timers) - Third-party client libraries
- React context providers that hold state
Minimize the client boundary
Push "use client" as deep into the component tree as possible. A good pattern: keep the page and data-fetching wrapper as RSCs, and only mark leaf components (buttons, forms, interactive widgets) as client:
// ✅ Good — page stays server, only the interactive button is client
// app/picklist/[id]/page.tsx (RSC)
export default async function PicklistPage({ params }) {
  const picklist = await getPicklist(params.id);  // server query
  return <PicklistView picklist={picklist} />;
}

// features/picklist/components/DeletePicklistButton.tsx
"use client";
export function DeletePicklistButton({ id }) { ... }
Context providers
Context providers must be client components (they use React state internally). The pattern: create a <FeatureProvider> client component that wraps its children, and mount it as high as needed in the tree without making parent RSCs into client components.
// features/totp/contexts/TOTPContext.tsx
"use client";
export function TOTPProvider({ secret, children }) { ... }

// app/@auth/page.tsx (RSC — just renders the provider)
export default async function AuthPage() {
  const secret = (await cookies()).get("toofaSecret")?.value;
  return (
    <TOTPProvider secret={secret}>
      <FlipperWrapper />
    </TOTPProvider>
  );
}
Centralized Routes
All route paths are defined in src/lib/routes.ts. Never hardcode route strings in components or actions — always import from routes.
// src/lib/routes.ts
export const routes = {
  home: "/",
  admin: {
    root: "/admin",
    members: "/admin/members",
    invites: "/admin/invites",
    event: "/admin/event",
    settings: "/admin/settings",
  },
  analysis: {
    team: (teamNumber: number | string) => `/analysis/teams/${teamNumber}` as const,
  },
  // ...
} as const;
Usage:
import { routes } from "@/lib/routes";

<Link href={routes.admin.members}>Members</Link>
<Link href={routes.analysis.team(1234)}>Team 1234</Link>
Why: Refactoring a URL means changing one place. TypeScript catches broken references at build time.
Parallel Routes (Conditional UI)
When a page needs to show fundamentally different UI based on auth state (or another condition), use Next.js parallel routes rather than conditional rendering in a single component.
The basecamp-fe app uses this for its auth gate:
app/
├── layout.tsx        # Renders both slots: {props.auth} and {props.unauth}
├── @auth/
│   └── page.tsx      # Shown when authenticated
└── @unauth/
    └── page.tsx      # Shown when unauthenticated
// app/layout.tsx
export default function RootLayout(props: LayoutProps<"/">) {
  return (
    <html>
      <body>
        {props.unauth}   {/* renders @unauth/page.tsx */}
        {props.auth}     {/* renders @auth/page.tsx  */}
      </body>
    </html>
  );
}
Each slot independently validates auth state and returns null if not applicable:
// app/@auth/page.tsx
export default async function AuthPage() {
  const token = (await cookies()).get("toofaToken")?.value;
  if (!token || !(await validateToken(token))) return null;
  // render authenticated UI
}

// app/@unauth/page.tsx
export default async function UnauthorizedPage() {
  const token = (await cookies()).get("toofaToken")?.value;
  if (token && (await validateToken(token))) return null;
  return <SignInForm />;
}
When to use parallel routes:
- Auth gates where the two states are visually distinct pages (not just a hidden button)
- Dashboard layouts with independently loading panels
- Modal overlays with intercepting routes
When NOT to use them: Simple show/hide toggles — use conditional rendering in a single component.
Shared UI Components
@repo/ui — cross-app design system
Radix UI primitives with Tailwind v4 styling. Import from the package path:
import { Button } from "@repo/ui/components/button";
import { Dialog, DialogContent, DialogTrigger } from "@repo/ui/components/dialog";
import { Table, TableBody, TableCell, TableHead } from "@repo/ui/components/table";
Use @repo/ui components as building blocks. Don't recreate primitives (buttons, inputs, dialogs) from scratch.
src/components/ — cross-feature app components
Components that are used by multiple features within the same app but aren't generic enough for @repo/ui:
Rule: If a component is only used by one feature, it belongs in src/features/<feature>/components/, not src/components/.
Lib Directory Rules
src/lib/ is for pure utilities and library configuration. It has no feature logic.
| Path | Contents |
|---|---|
lib/auth.ts |
Better Auth configuration |
lib/auth-client.ts |
Client-side auth helpers |
lib/permissions.ts |
Super admin checks |
lib/routes.ts |
Centralized route definitions |
lib/cache.ts |
Cache tag constants |
lib/utils.ts |
Generic utility functions (cn, etc.) |
lib/compress-image.ts |
Image compression utility |
lib/database/ |
Drizzle client, schema tables, relations, views, types |
lib/server/ |
Server-side helpers: auth guards, org helpers, storage, TBA, tokens |
lib/offline/ |
Network status, offline queue context, toasts |
What does NOT go in lib/:
- Feature-specific actions, queries, or components
- Anything that imports from
features/
Where Does My Code Go?
Use this decision tree when adding new code:
Is it a Next.js routing file (page, layout, loading, error)?
  └─ Yes → src/app/<route>/

Is it a database read?
  └─ Yes → src/features/<feature>/queries.ts  (with "server-only" import)

Is it a mutation / form submission handler?
  └─ Yes → src/features/<feature>/actions.ts  (with "use server")

Is it a React component used only by one feature?
  └─ Yes → src/features/<feature>/components/

Is it a React component used by multiple features?
  └─ Yes → src/components/  (if app-specific) or packages/ui (if cross-app)

Is it a React hook used only by one feature?
  └─ Yes → src/features/<feature>/hooks/

Is it a React context / provider for one feature?
  └─ Yes → src/features/<feature>/contexts/

Is it a route path string?
  └─ Yes → src/lib/routes.ts

Is it a cache tag string?
  └─ Yes → src/lib/cache.ts

Is it a shared type for one feature?
  └─ Yes → src/features/<feature>/types.ts

Is it a generic utility with no feature dependency?
  └─ Yes → src/lib/utils.ts  (or a new focused file in src/lib/)
Quick Reference
| Convention | Rule |
|---|---|
| Default RSC | All components are server by default; "use client" only when needed |
| Data fetching | Async RSC + queries.ts with "use cache" for expensive reads |
| Mutations | Server Actions in actions.ts; always auth → validate → transact → return |
| Routes | All paths in src/lib/routes.ts; never hardcode strings |
| Cache tags | All tags in src/lib/cache.ts via cacheTags object |
| Feature isolation | Each feature is self-contained; no cross-feature imports |
| Client boundary | Push "use client" as deep as possible |
server-only |
All queries.ts files start with import "server-only" |
| UI primitives | Use @repo/ui — don't reinvent buttons, dialogs, tables |
| Suspense | Wrap async RSCs in <Suspense> with skeleton fallbacks |
System Architecture
| NOTE: this is a living document and may not always be up to date. |
Documentation created with AI support.
System Overview
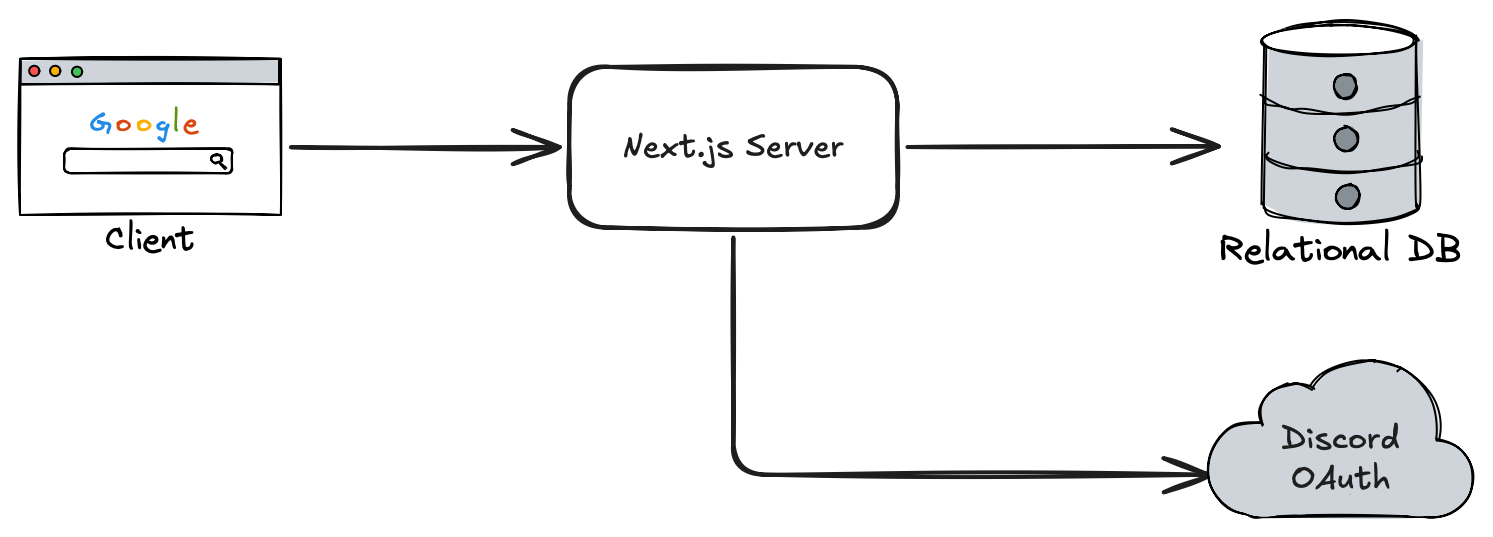
The scouting site is currently comprised of the following components:
- A Next.js Server
- Relational Database (PostgreSQL)
Component Overviews
Next.js Server
Framework documentation: https://nextjs.org/docs
Next.js is a full-stack React framework that enables server-side rendering and seamless client-server communication. The Next.js server acts as the central hub for handling client requests. It authenticates users via Discord OAuth, interacts with the PostgreSQL database to fetch or store scouting data, and serves the frontend UI to users. This setup ensures that only authorized users can access or submit data, while also maintaining a clean separation between the client, backend logic, and persistent storage.
PostgreSQL Database
PostgreSQL Documentation: https://www.postgresql.org
The relational database in this architecture serves as the persistent storage layer for the scouting site. It stores all essential data such as team information, match statistics, user profiles, and scouting submissions. The Next.js server acts as an intermediary, handling data validation, access control, and business logic before reading from or writing to the database. By using a relational database, the system benefits from structured schemas, efficient querying, and strong data integrity—ensuring that all scouting information is reliable and organized.
DrizzleORM
DrizzleORM Documentation: https://orm.drizzle.team/docs/overview
To interact with the database and manage migrations, we utilize DrizzleORM within the Next.js application (ORM - "Object-relationship manager"). Through Drizzle, we are able to easily manage database migrations, and write type-safe queries in our Next.js server. Drizzle also provides Drizzle Studio, an easy way to view and interact with your data locally.
Other Core Technologies
Docker
Docker Documentation: https://docs.docker.com
Docker is a platform that allows developers to package applications and their dependencies into lightweight, portable containers. These containers run consistently across different environments—whether on a developer’s laptop, a test server, or in production. With Docker, you can define your app’s environment in a Dockerfile, ensuring that everything from the operating system to libraries and runtime is standardized.
Our services are deployed using Docker Compose. We currently publish a Docker image of the Next.js server to the GitHub Container Registry. In development, we encourage using Docker to work with Postgres. This reduces "works on my machine" issues, and more closely simulates the production environment. The repository comes with scripts to properly start up a Docker container running Postgres locally.