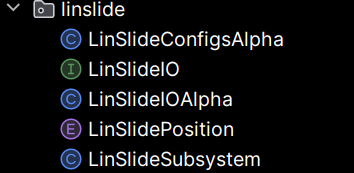
Akit File Structure
Overall Structure
When implementing akit into your robot code, you need always need four files for each subsystem: the configs file, the input output interface, input output class, and the subsystem file. For subsystems that move, such as an elevator, you also need an enum for positions.
Configs File
This file lists out all the configurations for the motors and sensors in the subsystem. It includes tuning constants, motor and sensor IDs, motor configs, and any motion magic requests you might need.
Follow the naming convention of "(SubsystemName)Configs".
Subsystem configs example:example from a hood subsystem. It contains the IDs and other unchangeable information need for configuration.
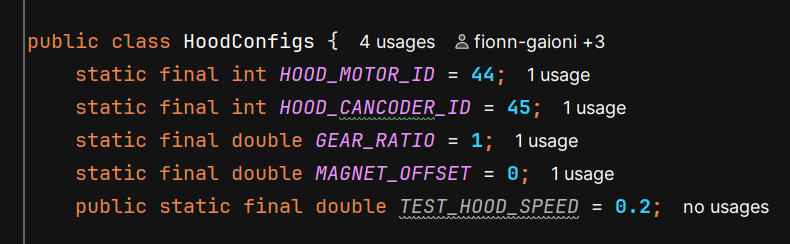
public class HoodConfigs {
    static final int HOOD_MOTOR_ID = 44;
    static final int HOOD_CANCODER_ID = 45;
    static final double GEAR_RATIO = 1;
    static final double MAGNET_OFFSET = 0;
    public static final double TEST_HOOD_SPEED = 0.2;
Tuning settingsconfigs example:for the k values and motion magic.
    public static final Slot0Configs SLOT_0_CONFIGS = new Slot0Configs()
            .withKP(2)
            .withKI(0)
            .withKD(0.5)
            .withKA(1.1)
            .withKV(0.4)
            .withKS(11.5);

    public static final MotionMagicConfigs MOTION_MAGIC_CONFIGS = new MotionMagicConfigs()
            .withMotionMagicAcceleration(8)
            .withMotionMagicCruiseVelocity(4)
            .withMotionMagicJerk(0);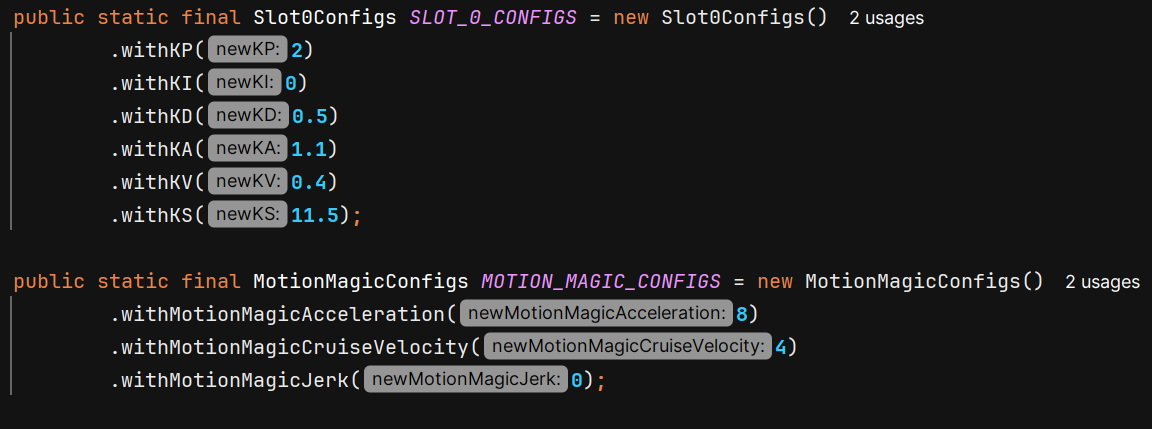
    static final TalonFXConfiguration TOP_MOTOR_CONFIGS = new TalonFXConfiguration()
            .withFeedback(new FeedbackConfigs().withSensorToMechanismRatio(2.89).withRotorToSensorRatio(1))
            .withSlot0(SLOT_0_CONFIGS)
            .withMotionMagic(MOTION_MAGIC_CONFIGS);

    static final TalonFXConfiguration BOTTOM_MOTOR_CONFIGS = new TalonFXConfiguration()
            .withFeedback(new FeedbackConfigs().withSensorToMechanismRatio(2.89).withRotorToSensorRatio(1))
            .withSlot0(SLOT_0_CONFIGS)
.withMotionMagic(MOTION_MAGIC_CONFIGS);MotorAn configsexample example:of what a tuned canrange looks like. We have a guide to tuning them here.

Canrangestatic configsfinal example:
CANrangeConfiguration 
CANRANGE_CONFIGS = new CANrangeConfiguration()
.withToFParams(new ToFParamsConfigs().withUpdateMode(UpdateModeValue.ShortRange100Hz))
.withFovParams(new FovParamsConfigs()
.withFOVCenterX(0)
.withFOVCenterY(0)
.withFOVRangeX(27)
.withFOVRangeY(27))
.withProximityParams(new ProximityParamsConfigs()
.withProximityThreshold(0.126)
.withProximityHysteresis(0.1)
.withMinSignalStrengthForValidMeasurement(2500));
Input Output Interface
This interface is used to list what you want to log with akit and how you want to be able to control the devices in the subsystem. It includes a class of all the inputs being logged.
The interface should be named "(SubsystemName)IO".
Inputs class to signify what akit is logging (make sure to use the @AutoLog decorator):
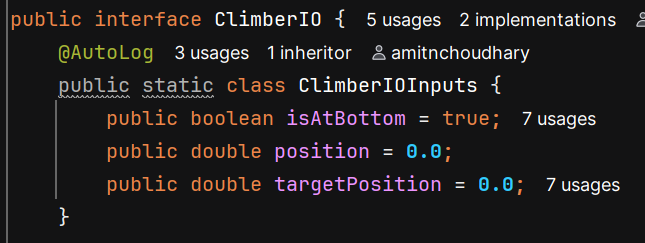
public interface ClimberIO {
    @AutoLog
    public static class ClimberIOInputs {
        public boolean isAtBottom = true;
        public double position = 0.0;
        public double targetPosition = 0.0;
    }
Because this is an interface (outside of the ClimberIOInputs from earlier), none of these methods should have any code in them. Each method should have the void return type and default keyword - they will only be using control requests when implemented. Every interface needs to include the updateInputs method. This will be used to actually log the inputs.
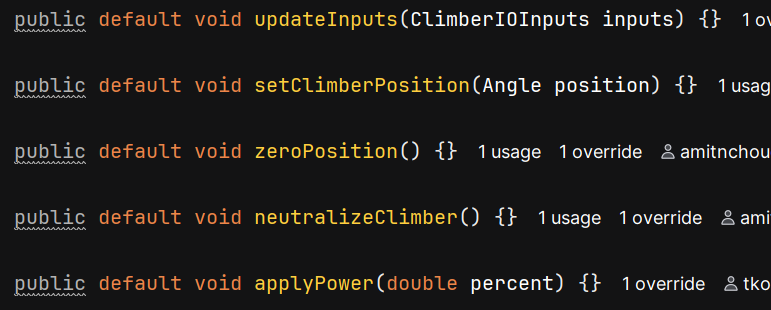
    public default void updateInputs(ClimberIOInputs inputs) {}

    public default void setClimberPosition(Angle position) {}

    public default void zeroPosition() {}

    public default void neutralizeClimber() {}

    public default void applyPower(double percent) {}
}
Input Output Class
This class implements the interface from before. It delineates what the subsystem is able to do, which should already have been decided in the interface.
Name it "(SubsystemName)IO(RobotVersion)". This is the only class that needs a new version for each robot version you have. So you might have a ShooterIOAlpha and a ShooterIOBeta.
Declare any devices and control requests in this class. Notice the use of the implements keyword.

public class ClimberIOAlpha implements ClimberIO {
    private final TalonFX climberMotor;
    private MotionMagicTorqueCurrentFOC magicRequest = new MotionMagicTorqueCurrentFOC(0);
    private DutyCycleOut dutyRequest = new DutyCycleOut(0);
Initialize all devices in the constructor. The if statement is used to add devices to the simulation when the robot is being simulated. You also need to add the configurations from the configs class to the motors and sensors.
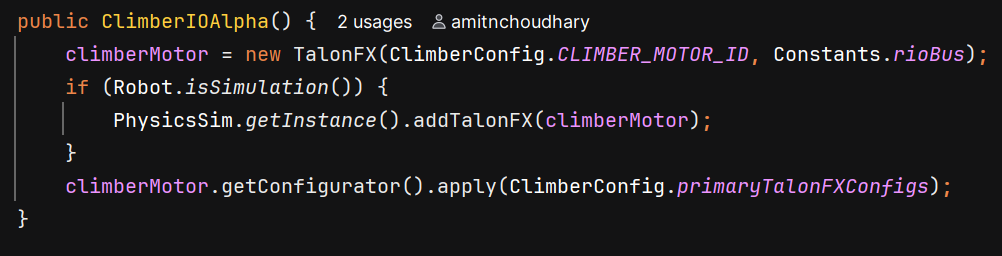
    public ClimberIOAlpha() {
        climberMotor = new TalonFX(ClimberConfig.CLIMBER_MOTOR_ID, Constants.rioBus);
        if (Robot.isSimulation()) {
            PhysicsSim.getInstance().addTalonFX(climberMotor);
        }
        climberMotor.getConfigurator().apply(ClimberConfig.primaryTalonFXConfigs);
    }
This is the implementation of the updateInputs method. The values you want to be updating are those declared and initialized in the SubsystemIOInputs class of the interface. The @Override decorator is needed for all methods in this class.

    @Override
    public void updateInputs(ClimberIOInputs inputs) {
        inputs.position = climberMotor.getPosition().getValueAsDouble();
        inputs.targetPosition = climberMotor.getClosedLoopReference().getValueAsDouble();
    }
This is the main part of the class. Every method you wrote in the interface will be implemented here. Make sure to use the @Override decorator for each method and to keep the exact same signature as you had in the interface. Each method willreturns controlnothing, only dictating how a motor andcan returnbe nothing.controlled.
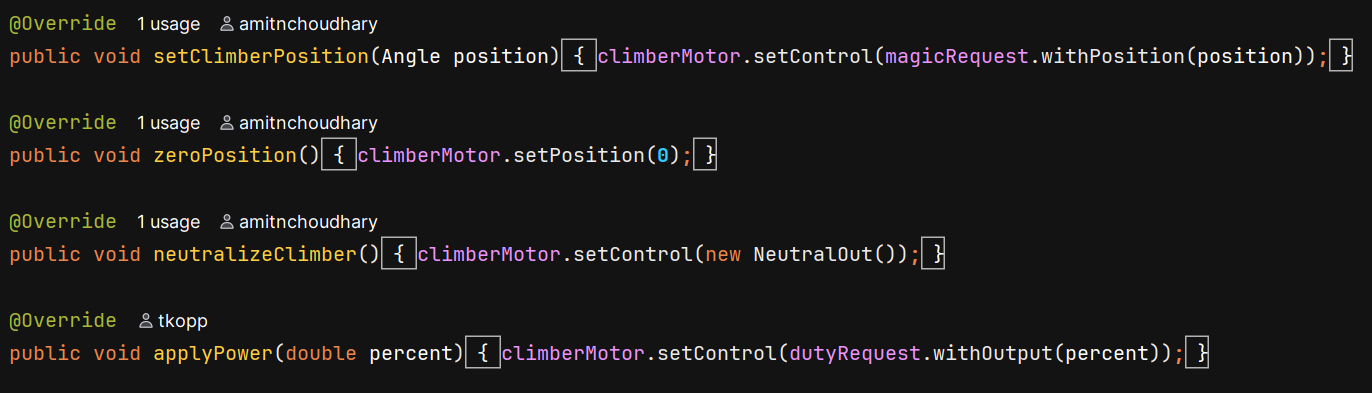
    @Override
    public void setClimberPosition(Angle position) {
        climberMotor.setControl(magicRequest.withPosition(position));
    }

    @Override
    public void zeroPosition() {
        climberMotor.setPosition(0);
    }

    @Override
    public void neutralizeClimber() {
        climberMotor.setControl(new NeutralOut());
    }

    @Override
    public void applyPower(double percent) {
        climberMotor.setControl(dutyRequest.withOutput(percent));
    }
}
Subsystem Class
The subsystem class uses the IO class to execute commands to run the motors as you specify. This is what will be used in RobotContainer.
Named "(SubsystemName)Subsystem".
Make sure to extend SubsystemBase to be able to use certain methods. Make an instance of the IO class you just created called "io". The second object is an instance of a class that is named the same as the class you created in the interface with "AutoLogged" at the end. It will throw an error until you build.

public class ClimberSubsystem extends SubsystemBase {
    private ClimberIO io;
    private ClimberIOInputsAutoLogged inputs = new ClimberIOInputsAutoLogged();
The constructor should take a parameter of the IO class you made earlier. Assign it to the io object you declared in this class. Additionally, any triggers you might need should be created in the constructor.

    public Climber(ClimberIO io) {
        this.io = io;
        new Trigger(() -> inputs.isAtBottom)
                .onTrue(Commands.runOnce(io::zeroPosition).andThen(io::neutralizeClimber));
    }
The periodic functions needs to be included in each subsystem class. It's inherited from the parent SubsystemBase class - hence the @Override decorator. The io.updateInputs(inputs); line should be the same in all subsystems, but the process inputs line will need a different key for each subsystem. Just make it the name of whatever subsystem you're coding.
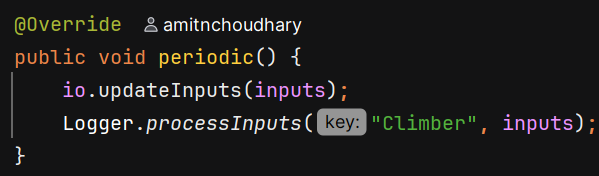
    @Override
    public void periodic() {
        io.updateInputs(inputs);
        Logger.processInputs("Climber", inputs);
    }
The commands for the class come last, along with getter methods. The methods to move the motors should return commands and use the methods from the IO class (which was instantiated as io).
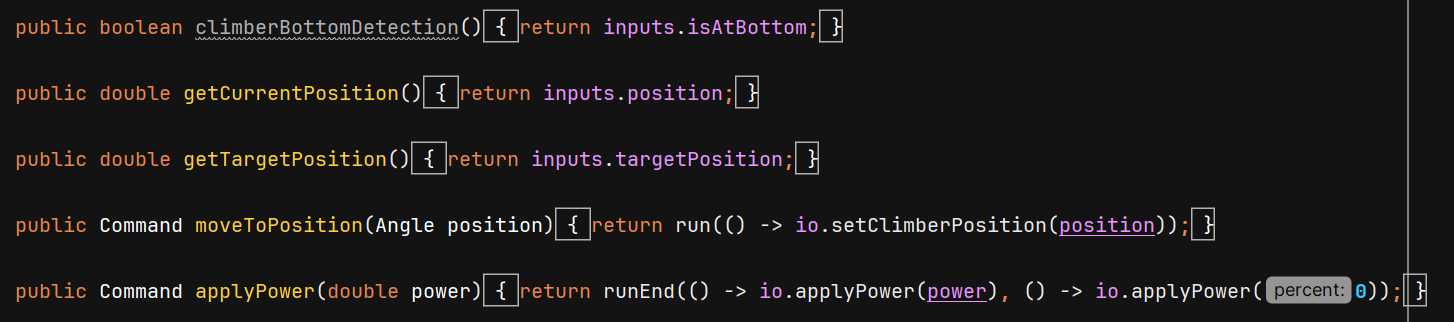
    public boolean climberBottomDetection() {
        return inputs.isAtBottom;
    }

    public double getCurrentPosition() {
        return inputs.position;
    }

    public double getTargetPosition() {
        return inputs.targetPosition;
    }

    public Command moveToPosition(Angle position) {
        return run(() -> io.setClimberPosition(position));
    }

    public Command applyPower(double power) {
        return runEnd(() -> io.applyPower(power), () -> io.applyPower(0));
    }
}
Position Enumeration
The enum is used to list positions or values for certain subsystems. Most subsystems won't need this.
"(SubsystemName)Position".
List out all the value names and what they are. The names should be capitalized because they should never be changed.
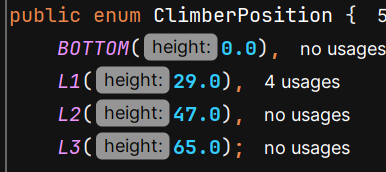
public enum ClimberPosition {
    BOTTOM(0.0),
    L1(29.0),
    L2(47.0),
    L3(65.0);
This line comes right after the values. It lists what data type they are and gives them a name.

private final Angle height;The constructor comes next. It's the same as any constructor for a class.

    ClimberPosition(double height) {
        this.height = Units.Rotations.of(height);
    }
The last thing is the getter method.

    public Angle getHeight() {
        return height;
    }
}